Monday, February 22, 2010

Guns - Fully Loaded


I love Lost.  One thing about it is that whenever Evangaline Lilly comes on, I am always amazed by her arms.  Look at the definition!  I want that!  And I'm going to try and get that.  

A year ago, Brian got a set of perfect pushups and began religiously doing sets of push ups every other day.  After a month or so of curiosity, I tried to do one.  In private cause even though I love that man, there are still some things a girl should do in private – push ups being one of them.  It’s a good thing I did it in private because I fell flat on my face and couldn’t even do one.  But a few weeks later, I tried again but did the modified push up (i.e. the girly way on my knees).  Brian helped me develop a plan of how many to do per set and we began doing it together.  After a month, I noticed a huge difference in my arms and even he commented on how much difference the push ups were making. 

After a while, I gathered enough confidence to try and regular pushup and was surprised to see that I was able to do 5.  Going from not even 1 pushup to 5 was a HUGE accomplishment for me.   Now I do 3 sets of pushups - regular, wide, and narrow.  Within each set, I do reps of 14, 8, and 6.  However, it took me a while to build up to these reps and I still struggle with it so I think I've reached my max pushup point.  When I first started with the girly pushups, I still did 3 sets but with reps of only 6, 4, and 2.  Doing pushups every other day will definitely build up your strength that will allow you to do more reps.  


Here's my technique for pushups the way that Brian has trained me on.


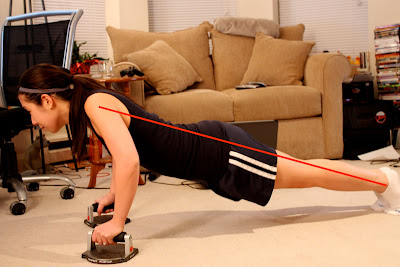
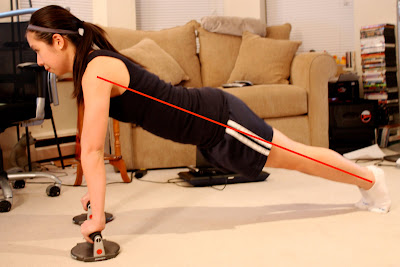
The most important parts when doing your pushup is to look forward so that you don't strain your neck.  Also, keep your body in a straight line.  If your butt is too low, bring that puppy up.  If your butt is too high, then you'll strain your back.  It works best if someone is there watching your form when you first start off so that you can start training properly without hurting or straining your muscles.  The pictures are of me doing a regular pushup but the advise is the same for knee pushups.


You should keep going down until your chest grazes the ground.  For girls with a bigger chest, this is ANOTHER reason for me to be jealous of you because it means you don't have to go down as low  :P

Start with girly pushups if you're just starting up, do pushups every other day, and be diligent.  I would suggest Googling the number of reps you should do because everyone is different.  


Sunday, February 21, 2010

Balls! Balls! And More Balls!


I was immediately smitten by these tissue paper pomanders that were on Ruffled.  Of course it meant I immediately had to copy the idea and do it myself.  I put the link the original instructions but I noticed that some of the pictures aren't loading so I've taken some pictures of my own process.  I'm very slow on craft related things (VERY slow) so the more pictures there are, the better it is for me.

Step 1: Find tissue paper in the colors that you like.  I used a mix of purples but I think it would look great in one plain color also.  Be sure to buy more tissue paper than you think you will need.  I bought 6 packets of tissue paper and I ran out before I was done with 2 pomanders.

Step 2: Cut your paper down to 10 inches by 5 inches.  Use a paper cutter - this will make your life infinitely easier.  Having your FI do this part will make it 10 times infinitely easier.  :)

Step 3: Fold your paper about .3 inches - accordion style.


Fold it on the SHORT edge - not the long edge. Or else you will have an epic fail that I did - something I didn't realize until a full day into the project.  This is what folding the wrong way looks like.  Sad.

Step 4: Once you have it folded all the way, fold it in half and round the edges.   I have it drawn here to show the shape before I cut but I generally just eyeball it and cut.  It doesn't need to be perfect.


Step 5: Cut wire pieces into 4 inch lengths and twist the wire around the middle of the tissue paper.  Do not twist the tissue paper.

Step 6: This is where you "fluff" the flower.  I found this part extremely confusing at first when I first tried it myself but I'll try to explain it as best I can.  You take one half of your tissue paper and expand it out.  Then take the first layer of this half and gently pull it up so that it stands up perpendicular.  


Once you have one layer fluffed up, repeat on the other side.  I would recommend doing one layer on one side, then switching to the other side before going on to the next layer.

Step 7: Finished flower!

Assemble your finished flowers into a styrofoam ball.  I used a 4 inch ball but I would actually suggest using a 5 inch ball instead so that your finished pomander is slightly bigger.  I bought mine in packs of 2 from Michaels and it's just not worth it for me to get new balls and start over.

Step 8: I attached my ribbon first by sticking the floral wire through the ribbon and attaching it to the styrofoam ball.  I think hot glue is optional - I didn't use the glue and it has held up hanging for the last few months. 
 

Step 9: Attach your flowers into the ball.  I packed mine very closely together at first but then it just took SO MANY flowers to fill the ball.  For the next one, I spread the flowers out a little further so that it looked less smooshed and also it took less flowers to fill the ball.


FIN!  I only have 4 pomanders done...4 more to go.  zomg.  These take a lot of time to do and it definitely is a labor of love.  I plan on using them as aisle decorations so hopefully these puppies will make for at least one fantastical photo.

Wednesday, February 17, 2010

Inspiration, Inspiration, You're An Inspiration, Baby!

You, you, you are
You, you, you are~

Man, Britney, you may be all kinds of whack sometimes but I still love you.

I technically don't have an official color scheme yet - just an official color of purple.  But I'm getting a little tired of the color with 8 months still to go so I'm probably going to have to think of accent colors soon.  Until then, here's my preliminary inspiration board.


After doing this, I realized I don't have a central theme.  For an hour, I panicked and randomly tried thinking of things that Brian and I both enjoy that we could make our central theme.  At one point, I even considered having a Red Sox themed wedding but, thankfully, Brian just gave me a raised eyebrow at that thought.  Then I came to my senses and realized, while as great as the Red Sox are, sometimes they just don't belong everywhere.

I think I've given up on having a central theme.  I'm not Martha - I won't have the perfect wedding.  But hopefully I'll have all the elements that make me happy and as long as I have my Bri-Bri and my friends and family that day, I'm pretty sure I'll be happy.  And dancing.  I'll need lots of dancing.  :)

Tuesday, February 9, 2010

Double Your Pleasure, Double Your Fun

I had fears that I would be a two-dress bride, sure that I would be a two-shoe bride (still working on the second shoe part), but I never thought I'd be a two reception bride.  I've mentioned before how I was looking forward to certain aspects of having a Chinese reception - mainly the tea ceremony.  Boston Chinatown is pretty small compared to other Chinatowns and there are only 3 main "true" dimsum restaurants.  (FYI: Windsor is a great alternative for dim sum if you don't mind not having the traditional carts).

Most of the places in Boston Chinatown are pretty old so I knew right away I wanted to hold our Chinese reception at Hei La Moon, which was recently renovated.  Also, they were the only place that had a website that posted their full wedding menu only - score for the twinkie girl with a Canto vocab of a 5 year old!  I was able to email the link to my Mom to show her the different menu options.  At this point, Brian and I had assumed we would be paying for this reception with some help with my parents.  Therefore we looked at the cheapest option, saw that it was still 10 courses, and called it good to go.

Well...not so much.  My Mom arrived a week later in Boston and immediately put down the deposit for the most expensive menu option because it had a small roast pig for each table.  o_0 ???  Individual table roast pigs?  Apparently it's not a Chinese wedding if there's no piggie.  Stuff I never knew...

I have no illusions - this is my Mom's wedding that she never really had.  For her own wedding, there was no money and she had to make do with very little.  This is a chance for her to make up for all that she never had.  I understand that and that is why I'm letting her do all this.  She has booked the photographer and videographer for the day and she has booked the transportation and emcee.  She has done more for this day than I have for my own wedding.  I feel slightly guilty about her paying for all this since she works so hard to save money and she has insisted on paying for everything herself.  I'm sure I'll contribute some but with the other wedding reception, it'll be hard.  And it's a compromise for both of us - my Mom dislikes many aspects of the Western wedding decisions I've made (dress, colors, etc) and I'm sure I'll feel very mulish about the "hokey" stuff she wants for the Chinese reception.  But I tell myself it's about a day of love and it'll be fun...if we can both survive the planning process.  =P

Monday, February 8, 2010

If I Ain't Got Money...

I love weddings and I love wedding planning. I have been obsessed with it since before I was even in a serious relationship with anyone. I buy into the hype of having pretty little details that no one will notice. I don’t mind sweating blood and tears into little crafts that a 5 year old could do better. I understand that there’s a whole wedding industry that’s been built around people like me who’s willing to spend money just for one day. However, I am still have my limits (after all, I am an accountant – aka realistic). Brian and I have set our budget and while it’s not a platinum wedding, it is a significant amount of money that has taken us a while to save for. We know we’re luckier than a LOT of people and that our budget is all relative. However, I can’t stand it when vendors make me feel bad about not being able to afford their business.

I came across a website for a photographer and on her pricing page, it stated “most brides budget between $5,000 - $10,000. If interested, please contact me for more information.” I’m sorry if you think this is a tactful way of saying, “if you ain’t got 5 G’s, you ain’t got me.” I can understand if your price point starts at $5,000 so why not just state that politely without coming through as condescending towards everyone else who can’t afford you.

I have met with vendors who have been outside my budget but have been very gracious during the meeting and have gone out of their way to find someone else as substitutes. I wish all people were like them. Has anyone else had similar experiences where they were left with a bad taste in their mouth from a vendor?